In this tutorial, we’re going to create a marketplace that uses both the fungible and non-fungible token (NFTs) contracts that we have learned about in previous tutorials. This is only for educational purposes and is not meant to be used in production See a production-ready marketplace in the NFT storefront repo. This contract is already deployed to testnet and mainnet and can be used by anyone for any generic NFT sale!
:::info[Action]
Open the starter code for this tutorial in the Flow Playground: <a href=“https://play.flow.com/7355d51c-066b-46be-adab-a3da6c28b645 ” target=“_blank”
https://play.flow.com/7355d51c-066b-46be-adab-a3da6c28b645 The tutorial will be asking you to take various actions to interact with this code. The marketplace setup guide shows you how to get the playground set up to do this tutorial.
:::
:::info[Action]
Instructions that require you to take action are always included in a callout box like this one. These highlighted actions are all that you need to do to get your code running, but reading the rest is necessary to understand the language’s design.
:::
Marketplaces are a popular application of blockchain technology and smart contracts. When there are NFTs in existence, users usually want to be able to buy and sell them with their fungible tokens.
Now that there is an example for both fungible and non-fungible tokens, we can build a marketplace that uses both. This is referred to as composability: the ability for developers to leverage shared resources, such as code or userbases, and use them as building blocks for new applications.
Flow is designed to enable composability because of the way that interfaces, resources and capabilities are designed.
- Interfaces allow projects to support any generic type as long as it supports a standard set of functionality specified by an interface.
- Resources can be passed around and owned by accounts, contracts or even other resources, unlocking different use cases depending on where the resource is stored.
- Capabilities allow exposing user-defined sets of functionality through special objects that enforce strict security with Cadence’s type system.
The combination of these allows developers to do more with less, re-using known safe code and design patterns to create new, powerful, and unique interactions!
:::info[Action]
At some point before or after this tutorial, you should definitely check out the formal documentation linked above about interfaces, resources, and capabilities. It will help complete your understanding of these complex, but powerful features.
:::
To create a marketplace, we need to integrate the functionality of both fungible and non-fungible tokens into a single contract that gives users control over their money and assets. To accomplish this, we’re going to take you through these steps to create a composable smart contract and get comfortable with the marketplace:
- Ensure that your fungible token and non-fungible token contracts are deployed and set up correctly.
- Deploy the marketplace type declarations to account
0x08. - Create a marketplace object and store it in your account storage, putting an NFT up for sale and publishing a public capability for your sale.
- Use a different account to purchase the NFT from the sale.
- Run a script to verify that the NFT was purchased.
Before proceeding with this tutorial, you need to complete the Fungible Tokens and Non-Fungible Token tutorials to understand the building blocks of this smart contract.
Marketplace Design
One way to implement a marketplace is to have a central smart contract that users deposit their NFTs and their price into, and have anyone come by and be able to buy the token for that price. This approach is reasonable, but it centralizes the process and takes away options from the owners. We want users to be able to maintain ownership of the NFTs that they are trying to sell while they are trying to sell them.
Instead of taking this centralized approach, each user can list a sale from within their own account.
Then, users could either provide a link to their sale to an application that can list it centrally on a website, or to a central sale aggregator smart contract if they want the entire transaction to stay on-chain. This way, the owner of the token keeps custody of their token while it is on sale.
:::info[Action]
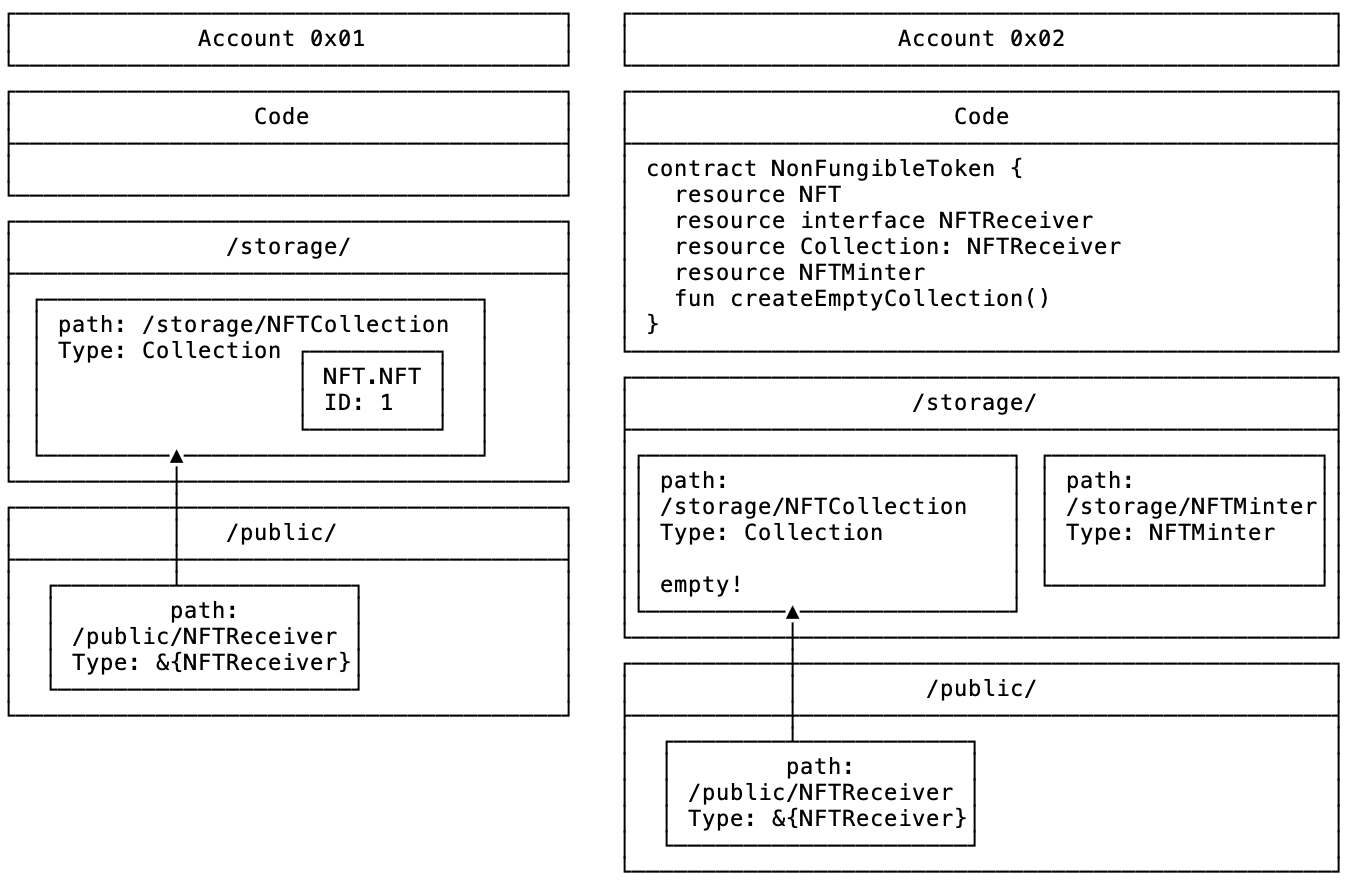
Before we start, we need to confirm the state of your accounts.
If you haven’t already, please perform the steps in the marketplace setup guide to ensure that the Fungible Token and Non-Fungible Token contracts are deployed to account 6 and 2 and own some tokens.
Your accounts should look like this:
:::
:::info[Action]
You can run the 1. Check Setup script to ensure that your accounts are correctly set up:
:::
// CheckSetupScript.cdc

import ExampleToken from 0x06
import ExampleNFT from 0x07

/// Allows the script to return the ownership info
/// of all the accounts
access(all) struct OwnerInfo {
  access(all) let acct6Balance: UFix64
  access(all) let acct7Balance: UFix64

  access(all) let acct6IDs: [UInt64]
  access(all) let acct7IDs: [UInt64]

  init(balance1: UFix64, balance2: UFix64, acct6IDs: [UInt64], acct7IDs: [UInt64]) {
    self.acct6Balance = balance1
    self.acct7Balance = balance2
    self.acct6IDs = acct6IDs
    self.acct7IDs = acct7IDs
  }
}

// This script checks that the accounts are set up correctly for the marketplace tutorial.
//
// Account 0x06: Vault Balance = 40, NFT.id = 1
// Account 0x07: Vault Balance = 20, No NFTs
access(all) fun main(): OwnerInfo {
    // Get the accounts' public account objects
    let acct6 = getAccount(0x06)
    let acct7 = getAccount(0x07)

    // Get references to the account's receivers
    // by getting their public capability
    // and borrowing a reference from the capability
    let acct6ReceiverRef = acct6.capabilities.get<&{ExampleToken.Balance}>
                          (/public/CadenceFungibleTokenTutorialReceiver)
                          .borrow()
            ?? panic("Could not borrow a balance reference to "
                     .concat("0x06's ExampleToken.Vault")
                     .concat(". Make sure 0x06 has set up its account ")
                     .concat("with an ExampleToken Vault and valid capability."))

    let acct7ReceiverRef = acct7.capabilities.get<&{ExampleToken.Balance}>
                          (/public/CadenceFungibleTokenTutorialReceiver)
                          .borrow()
            ?? panic("Could not borrow a balance reference to "
                     .concat("0x07's ExampleToken.Vault")
                     .concat(". Make sure 0x07 has set up its account ")
                     .concat("with an ExampleToken Vault and valid capability."))

    let returnArray: [UFix64] = []

    // verify that the balances are correct
    if acct6ReceiverRef.balance != 40.0 || acct7ReceiverRef.balance != 20.0 {
        panic("Wrong balances!")
    }

    // Find the public Receiver capability for their Collections
    let acct6Capability = acct6.capabilities.get<&{ExampleNFT.NFTReceiver}>(ExampleNFT.CollectionPublicPath)
    let acct7Capability = acct7.capabilities.get<&{ExampleNFT.NFTReceiver}>(ExampleNFT.CollectionPublicPath)

    // borrow references from the capabilities
    let nft1Ref = acct6Capability.borrow()
        ?? panic("Could not borrow a collection reference to 0x06's ExampleNFT.Collection"
                 .concat(" from the path ")
                 .concat(ExampleNFT.CollectionPublicPath.toString())
                 .concat(". Make sure account 0x06 has set up its account ")
                 .concat("with an ExampleNFT Collection."))

    let nft2Ref = acct7Capability.borrow()
        ?? panic("Could not borrow a collection reference to 0x07's ExampleNFT.Collection"
                 .concat(" from the path ")
                 .concat(ExampleNFT.CollectionPublicPath.toString())
                 .concat(". Make sure account 0x07 has set up its account ")
                 .concat("with an ExampleNFT Collection."))

    // verify that the collections are correct
    if nft1Ref.getIDs()[0] != 1 || nft2Ref.getIDs().length != 0 {
        panic("Wrong Collections!")
    }

    // Return the struct that shows the account ownership info
    return OwnerInfo(balance1: acct6ReceiverRef.balance,
                     balance2: acct7ReceiverRef.balance,
                     acct6IDs: nft1Ref.getIDs(),
                     acct7IDs: nft2Ref.getIDs())
}
You should see something similar to this output if your accounts are set up correctly. They are in the same state that they would have been in if you followed the Fungible Tokens and Non-Fungible Tokens tutorials in succession:
"Account 6 Balance"
40.00000000
"Account 7 Balance"
20.00000000
"Account 6 NFTs"
[1]
"Account 7 NFTs"
[]
Now that your accounts are in the correct state, we can build a marketplace that enables the sale of NFT’s between accounts.
Setting up an NFT Marketplace
Every user who wants to sell an NFT will store an instance of a @SaleCollection resource in their account storage.
Time to deploy the marketplace contract:
:::info[Action]
- Switch to the ExampleMarketplace contract (Contract 3).
- With
ExampleMarketplace.cdcopen, select account0x08from the deployment modal in the bottom right and deploy.
:::
ExampleMarketplace.cdc should contain the following contract definition:
import ExampleToken from 0x06
import ExampleNFT from 0x07

// ExampleMarketplace.cdc
//
// The ExampleMarketplace contract is a very basic sample implementation of an NFT ExampleMarketplace on Flow.
//
// This contract allows users to put their NFTs up for sale. Other users
// can purchase these NFTs with fungible tokens.
//
// Learn more about marketplaces in this tutorial: https://developers.flow.com/cadence/tutorial/marketplace-compose
//
// This contract is a learning tool and is not meant to be used in production.
// See the NFTStorefront contract for a generic marketplace smart contract that
// is used by many different projects on the Flow blockchain:
//
// https://github.com/onflow/nft-storefront

access(all) contract ExampleMarketplace {

    // Event that is emitted when a new NFT is put up for sale
    access(all) event ForSale(id: UInt64, price: UFix64, owner: Address?)

    // Event that is emitted when the price of an NFT changes
    access(all) event PriceChanged(id: UInt64, newPrice: UFix64, owner: Address?)

    // Event that is emitted when a token is purchased
    access(all) event TokenPurchased(id: UInt64, price: UFix64, seller: Address?, buyer: Address?)

    // Event that is emitted when a seller withdraws their NFT from the sale
    access(all) event SaleCanceled(id: UInt64, seller: Address?)

    access(all) entitlement Owner

    // SaleCollection
    //
    // NFT Collection object that allows a user to put their NFT up for sale
    // where others can send fungible tokens to purchase it
    //
    access(all) resource SaleCollection  {

        /// A capability for the owner's collection
        access(self) var ownerCollection: Capability<auth(ExampleNFT.Withdraw) &ExampleNFT.Collection>

        // Dictionary of the prices for each NFT by ID
        access(self) var prices: {UInt64: UFix64}

        // The fungible token vault of the owner of this sale.
        // When someone buys a token, this resource can deposit
        // tokens into their account.
        access(account) let ownerVault: Capability<&{ExampleToken.Receiver}>

        init (ownerCollection: Capability<auth(ExampleNFT.Withdraw) &ExampleNFT.Collection>,
              ownerVault: Capability<&{ExampleToken.Receiver}>) {

            pre {
                // Check that the owner's collection capability is correct
                ownerCollection.check():
                    "ExampleMarketplace.SaleCollection.init: "
                    .concat("Owner's NFT Collection Capability is invalid! ")
                    .concat("Make sure the owner has set up an `ExampleNFT.Collection` ")
                    .concat("in their account and provided a valid capability")

                // Check that the fungible token vault capability is correct
                ownerVault.check():
                    "ExampleMarketplace.SaleCollection.init: "
                    .concat("Owner's Receiver Capability is invalid! ")
                    .concat("Make sure the owner has set up an `ExampleToken.Vault` ")
                    .concat("in their account and provided a valid capability")
            }
            self.ownerCollection = ownerCollection
            self.ownerVault = ownerVault
            self.prices = {}
        }

        // cancelSale gives the owner the opportunity to cancel a sale in the collection
        access(Owner) fun cancelSale(tokenID: UInt64) {
            // remove the price
            self.prices.remove(key: tokenID)
            self.prices[tokenID] = nil

            // Nothing needs to be done with the actual token because it is already in the owner's collection
        }

        // listForSale lists an NFT for sale in this collection
        access(Owner) fun listForSale(tokenID: UInt64, price: UFix64) {
            pre {
                self.ownerCollection.borrow()!.idExists(id: tokenID):
                    "ExampleMarketplace.SaleCollection.listForSale: "
                    .concat("Cannot list token ID ").concat(tokenID.toString())
                    .concat(" . This NFT ID is not owned by the seller.")
                    .concat("Make sure an ID exists in the sellers NFT Collection")
                    .concat(" before trying to list it for sale")
            }
            // store the price in the price array
            self.prices[tokenID] = price

            emit ForSale(id: tokenID, price: price, owner: self.owner?.address)
        }

        // changePrice changes the price of a token that is currently for sale
        access(Owner) fun changePrice(tokenID: UInt64, newPrice: UFix64) {
            self.prices[tokenID] = newPrice

            emit PriceChanged(id: tokenID, newPrice: newPrice, owner: self.owner?.address)
        }

        // purchase lets a user send tokens to purchase an NFT that is for sale
        access(all) fun purchase(tokenID: UInt64,
                                 recipient: Capability<&ExampleNFT.Collection>, buyTokens: @ExampleToken.Vault) {
            pre {
                self.prices[tokenID] != nil:
                    "ExampleMarketplace.SaleCollection.purchase: "
                    .concat("Cannot purchase NFT with ID ")
                    .concat(tokenID.toString())
                    .concat(" There is not an NFT with this ID available for sale! ")
                    .concat("Make sure the ID to purchase is correct.")
                buyTokens.balance >= (self.prices[tokenID] ?? 0.0):
                    "ExampleMarketplace.SaleCollection.purchase: "
                    .concat(" Cannot purchase NFT with ID ")
                    .concat(tokenID.toString())
                    .concat(" The amount provided to purchase (")
                    .concat(buyTokens.balance.toString())
                    .concat(") is less than the price of the NFT (")
                    .concat(self.prices[tokenID]!.toString())
                    .concat("). Make sure the ID to purchase is correct and ")
                    .concat("the correct amount of tokens have been used to purchase.")
                recipient.borrow != nil:
                    "ExampleMarketplace.SaleCollection.purchase: "
                    .concat(" Cannot purchase NFT with ID ")
                    .concat(tokenID.toString())
                    .concat(". The buyer's NFT Collection Capability is invalid.")
            }

            // get the value out of the optional
            let price = self.prices[tokenID]!

            self.prices[tokenID] = nil

            let vaultRef = self.ownerVault.borrow()
                ?? panic("Could not borrow reference to owner token vault")

            // deposit the purchasing tokens into the owners vault
            vaultRef.deposit(from: <-buyTokens)

            // borrow a reference to the object that the receiver capability links to
            // We can force-cast the result here because it has already been checked in the pre-conditions
            let receiverReference = recipient.borrow()!

            // deposit the NFT into the buyers collection
            receiverReference.deposit(token: <-self.ownerCollection.borrow()!.withdraw(withdrawID: tokenID))

            emit TokenPurchased(id: tokenID, price: price, seller: self.owner?.address, buyer: receiverReference.owner?.address)
        }

        // idPrice returns the price of a specific token in the sale
        access(all) view fun idPrice(tokenID: UInt64): UFix64? {
            return self.prices[tokenID]
        }

        // getIDs returns an array of token IDs that are for sale
        access(all) view fun getIDs(): [UInt64] {
            return self.prices.keys
        }
    }

    // createCollection returns a new collection resource to the caller
    access(all) fun createSaleCollection(
        ownerCollection: Capability<auth(ExampleNFT.Withdraw) &ExampleNFT.Collection>,
        ownerVault: Capability<&{ExampleToken.Receiver}>
    ): @SaleCollection
    {
        return <- create SaleCollection(ownerCollection: ownerCollection, ownerVault: ownerVault)
    }
}
This marketplace contract has resources that function similarly to the NFT Collection
that was explained in Non-Fungible Tokens, with a few differences and additions:
- This marketplace contract has methods to add and remove NFTs, but instead of storing the NFT resource object in the sale collection,
the user provides a capability to their main collection that allows the listed NFT to be withdrawn and transferred when it is purchased.
When a user wants to put their NFT up for sale, they do so by providing the ID and the price to the
listForSale()function. Then, another user can call thepurchase()function, sending theirExampleToken.Vaultthat contains the currency they are using to make the purchase. The buyer also includes a capability to their NFTExampleNFT.Collectionso that the purchased token can be immediately deposited into their collection when the purchase is made. - This marketplace contract stores a capability:
access(all) let ownerVault: Capability<&{FungibleToken.Receiver}>. The owner of the sale saves a capability to their Fungible TokenReceiverwithin the sale. This allows the sale resource to be able to immediately deposit the currency that was used to buy the NFT into the ownersVaultwhen a purchase is made. - This marketplace contract includes events. Cadence supports defining events within contracts that can be emitted when important actions happen. External apps can monitor these events to know the state of the smart contract.
    // Event that is emitted when a new NFT is put up for sale
    access(all) event ForSale(id: UInt64, price: UFix64, owner: Address?)

    // Event that is emitted when the price of an NFT changes
    access(all) event PriceChanged(id: UInt64, newPrice: UFix64, owner: Address?)

    // Event that is emitted when a token is purchased
    access(all) event TokenPurchased(id: UInt64, price: UFix64, seller: Address?, buyer: Address?)

    // Event that is emitted when a seller withdraws their NFT from the sale
    access(all) event SaleCanceled(id: UInt64, seller: Address?)
This contract has a few new features and concepts that are important to cover:
Events
Events are special values that can be emitted during the execution of a program. They usually contain information to indicate that some important action has happened in a smart contract, such as an NFT transfer, a permission change, or many other different things. Off-chain applications can monitor events using a Flow SDK to know what is happening on-chain without having to query a smart contract directly.
Many applications want to maintain an off-chain record of what is happening on-chain so they can have faster performance when getting information about their users’ accounts or generating analytics.
Events are declared by indicating the access level, event,
and the name and parameters of the event, like a function declaration:
access(all) event ForSale(id: UInt64, price: UFix64, owner: Address?)Events cannot modify state at all; they indicate when important actions happen in the smart contract.
Events are emitted with the emit keyword followed by the invocation of the event as if it were a function call.
emit ForSale(id: tokenID, price: price, owner: self.owner?.address)External applications can monitor the blockchain to take action when certain events are emitted.
Resource-Owned Capabilities
We have covered capabilities in previous tutorials, but only the basics. Capabilities can be used for so much more!
As you hopefully understand, capabilites are links to private objects in account storage that specify and expose a subset of the resource they are linked to.
To create a capability, a user typically uses the account.capabilities.storage.issue
method to create a link to a resource in their private storage, specifying a type to link the capability as:
let cap = acct.capabilities.storage.issue<&ExampleNFT.Collection>(ExampleNFT.CollectionStoragePath)After that, the owner can publish the capability to a public path in their account:
acct.capabilities.publish(cap, at: ExampleNFT.CollectionPublicPath)Then, users can get that capability from the public path, borrow it, and access the functionality that the owner specified.
// Get the account object for address 0x06
let publicAccount = getAccount(0x06)

// Retrieve a Vault Receiver Capability from the account's public storage
let acct6Capability = acct.capabilities.get<&{ExampleToken.Receiver}>(
        ExampleToken.VaultPublicPath
    )

// Borrow a reference
let acct6ReceiverRef = acct6Capability.borrow()
    ?? panic("Account 0x06's Receiver Capability is invalid! ")
            .concat("Make sure the owner has set up an `ExampleToken.Vault` ")
            .concat("in their account and provided a valid capability")

// Deposit tokens
acct6ReceiverRef.deposit(from: <-tokens)
With the marketplace contract, we are utilizing a new feature of capabilities. Capabilities can be stored anywhere! Lots of functionality is contained within resources, and developers will sometimes want to be able to access some of the functionality of resources from within different resources or contracts.
We store two different capabilities in the marketplace sale collection:
/// A capability for the owner's collection
access(self) var ownerCollection: Capability<auth(ExampleNFT.Withdraw) &ExampleNFT.Collection>

// The fungible token vault of the owner of this sale.
// When someone buys a token, this resource can deposit
// tokens into their account.
access(account) let ownerVault: Capability<&{ExampleToken.Receiver}>
If an object like a contract or resource owns a capability, they can borrow a reference to that capability at any time to access that functionality without having to get it from the owner’s account every time.
This is especially important if the owner wants to expose some functionality that is only intended for one person,
meaning that the link for the capability is not stored in a public path.
We do that in this example, because the sale collection stores a capability
that can access the withdraw functionality
of the ExampleNFT.Collection with the ExampleNFT.Withdraw entitlement.
It needs this because it withdraws the specified NFT in the purchase() method to send to the buyer.
It is important to remember that control of a capability does not equal ownership of the underlying resource.
You can use the capability to access that resource’s functionality, but you can’t use it to fake ownership.
You need the actual resource (identified by the prefixed @ symbol) to prove ownership.
Additionally, these capabilities can be stored anywhere, but if a user decides that they no longer want the capability
to be used, they can revoke it by getting the controller for the capability
from their account with the getControllers method and delete the capability with delete.
Here is an example that deletes all the controllers for a specified storage path:
let controllers = self.account.capabilities.storage.getControllers(forPath: storagePath)
for controller in controllers {
    controller.delete()
}
After this, any capabilities that use that storage path are rendered invalid.

One last piece to consider about capabilities is the decision about
when to use them instead of storing the resource directly.
This tutorial used to have the `SaleCollection` directly store the NFTs that were for sale, like so:

```cadence
access(all) resource SaleCollection {

    /// Dictionary of NFT objects for sale
    /// Maps ID to NFT resource object
    /// Not recommended
    access(self) var forSale: @{UInt64: ExampleNFT.NFT}
}
This is a logical way to do it, and illustrates another important concept in Cadence, that resources can own other resources! Check out the Kitty Hats tutorial for a little more exploration of this concept.
In this case however, nesting resources doesn’t make sense. If a user decides to store their for-sale NFTs in a separate place from their main collection, then those NFTs are not available to be shown to any app or smart contract that queries the main collection, so it is as if the owner doesn’t actually own the NFT!
In cases like this, we usually recommend using a capability to the main collection so that the main collection can remain unchanged and fully usable by other smart contracts and apps. This also means that if a for-sale NFT gets transferred by some means other than a purchase, then you need a way to get rid of the stale listing. That is out of the scope of this tutorial though.
Enough explaining! Lets execute some code!
Using the Marketplace
At this point, we should have an ExampleToken.Vault and an Example.NFT.Collection in both accounts’ storage.
Account 0x06 should have an NFT in their collection and the ExampleMarketplace contract should be deployed to 0x08.
You can create a SaleCollection and list account 0x06’s token for sale by following these steps:
:::info[Action]
- Open Transaction 4,
Create Sale - Select account
0x06as the only signer and click theSendbutton to submit the transaction.
:::
// CreateSale.cdc

import ExampleToken from 0x06
import ExampleNFT from 0x07
import ExampleMarketplace from 0x08

// This transaction creates a new Sale Collection object,
// lists an NFT for sale, puts it in account storage,
// and creates a public capability to the sale so that others can buy the token.
transaction {

    prepare(acct: auth(SaveValue, StorageCapabilities) &Account) {

        // Borrow a reference to the stored Vault
        let receiver = acct.capabilities.get<&{ExampleToken.Receiver}>(ExampleToken.VaultPublicPath)

        // Create an entitled capability to the NFT Collection
        let collectionCapability = acct.capabilities.storage.issue
                                   <auth(ExampleNFT.Withdraw) &ExampleNFT.Collection>
                                   (ExampleNFT.CollectionStoragePath)

        // Create a new Sale object,
        // initializing it with the reference to the owner's vault
        let sale <- ExampleMarketplace.createSaleCollection(ownerCollection: collectionCapability, ownerVault: receiver)

        // List the token for sale by moving it into the sale object
        sale.listForSale(tokenID: 1, price: 10.0)

        // Store the sale object in the account storage
        acct.storage.save(<-sale, to: /storage/NFTSale)

        // Create a public capability to the sale so that others can call its methods
        acct.capabilities.storage.issue<&ExampleMarketplace.SaleCollection>(/public/NFTSale, target: /storage/NFTSale)

        log("Sale Created for account 6. Selling NFT 1 for 10 tokens")
    }
}
This transaction:
- Gets a
Receivercapability on the ownersVault. - Creates a private entitled
ExampleNFT.CollectionCapability from the owner. - Creates the
SaleCollection, which stores theirVaultandExampleNFT.Collectioncapabilities. - Lists the token with
ID = 1for sale and sets its price as 10.0. - Stores the
SaleCollectionin their account storage and links a public capability that allows others to purchase any NFTs for sale.
Let’s run a script to ensure that the sale was created correctly.
- Open Script 2:
GetSaleIDs.cdc - Click the
Executebutton to print the ID and price of the NFT that account0x06has for sale.
// GetSaleIDs.cdc

import ExampleToken from 0x06
import ExampleNFT from 0x07
import ExampleMarketplace from 0x08

// This script returns the NFTs that account 0x06 has for sale.
access(all)
fun main(): [UInt64] {
    // Get the public account object for account 0x06
    let account1 = getAccount(0x06)

    // Find the public Sale reference to their Collection
    let acct6saleRef = account1.capabilities.get<&ExampleMarketplace.SaleCollection>(/public/NFTSale)>
                       .borrow()
        ?? panic("Could not borrow a reference to the SaleCollection capability for account 0x06 ")
            .concat("at path /public/NFTSale. ")
            .concat("Make sure the owner has set up the SaleCollection ")
            .concat("in their account with the Create Sale transaction")

    // Return the NFT IDs that are for sale
    return acct6saleRef.getIDs()
}
This script should complete and print something like this:
[1]Purchasing an NFT
The buyer can now purchase the seller’s NFT by using the transaction in Transaction2.cdc:
:::info[Action]
- Open Transaction 5:
PurchaseSale.cdcfile - Select account
0x07as the only signer and click theSendbutton
:::
// PurchaseSale.cdc

import ExampleToken from 0x06
import ExampleNFT from 0x07
import ExampleMarketplace from 0x08

// This transaction uses the signers Vault tokens to purchase an NFT
// from the Sale collection of account 0x06.
transaction {

    // Capability to the buyer's NFT collection where they
    // will store the bought NFT
    let collectionCapability: Capability<&ExampleNFT.Collection>

    // Vault that will hold the tokens that will be used to
    // but the NFT
    let temporaryVault: @ExampleToken.Vault

    prepare(acct: auth(BorrowValue) &Account) {

        // get the references to the buyer's fungible token Vault and NFT Collection Receiver
        self.collectionCapability = acct.capabilities.get<&ExampleNFT.Collection>(ExampleNFT.CollectionPublicPath)

        let vaultRef = acct.storage.borrow<&ExampleToken.Vault>(from: /storage/CadenceFungibleTokenTutorialVault)
            ?? panic("Could not borrow a reference to "
                     .concat("0x07's ExampleToken.Vault")
                     .concat(". Make sure 0x07 has set up its account ")
                     .concat("with an ExampleToken Vault and valid capability."))

        // withdraw tokens from the buyers Vault
        self.temporaryVault <- vaultRef.withdraw(amount: 10.0)
    }

    execute {
        // get the read-only account storage of the seller
        let seller = getAccount(0x06)

        // get the reference to the seller's sale
        let saleRef = seller.capabilities.get<&ExampleMarketplace.SaleCollection>(/public/NFTSale)
                            .borrow()
            ?? panic("Could not borrow a reference to "
                     .concat("0x06's ExampleMarketplace.SaleCollection")
                     .concat(". Make sure 0x06 has set up its account ")
                     .concat("with an ExampleMarketplace SaleCollection and valid capability."))

        // purchase the NFT the seller is selling, giving them the capability
        // to your NFT collection and giving them the tokens to buy it
        saleRef.purchase(tokenID: 1, recipient: self.collectionCapability, buyTokens: <-self.temporaryVault)
    }
}
This transaction:
- Gets the capability to the buyer’s NFT receiver
- Get a reference to their token vault and withdraws the sale purchase amount
- Gets the public account object for account
0x06 - Gets the reference to the seller’s public sale
- Calls the
purchasefunction, passing in the tokens and theCollectionreference. Thenpurchasedeposits the bought NFT directly into the buyer’s collection.
Verifying the NFT Was Purchased Correctly
You can run now run a script to verify that the NFT was purchased correctly because:
- account
0x06has 50 tokens and does not have any NFTs for sale or in their collection and account - account
0x07has 10 tokens and an NFT with id=1
To run a script that verifies the NFT was purchased correctly, follow these steps:
:::info[Action]
- Open Script 3:
VerifyAfterPurchase.cdc - Click the
Executebutton
:::
VerifyAfterPurchase.cdc should contain the following code:
// VerifyAfterPurchase
import ExampleToken from 0x06
import ExampleNFT from 0x07

/// Allows the script to return the ownership info
/// of all the accounts
access(all) struct OwnerInfo {
  access(all) let acct6Balance: UFix64
  access(all) let acct7Balance: UFix64

  access(all) let acct6IDs: [UInt64]
  access(all) let acct7IDs: [UInt64]

  init(balance1: UFix64, balance2: UFix64, acct6IDs: [UInt64], acct7IDs: [UInt64]) {
    self.acct6Balance = balance1
    self.acct7Balance = balance2
    self.acct6IDs = acct6IDs
    self.acct7IDs = acct7IDs
  }
}

// This script checks that the accounts are in the correct state after purchasing a listing.
//
// Account 0x06: Vault Balance = 50, No NFTs
// Account 0x07: Vault Balance = 10, NFT.id = 1
access(all) fun main(): OwnerInfo {
    // Get the accounts' public account objects
    let acct6 = getAccount(0x06)
    let acct7 = getAccount(0x07)

    // Get references to the account's receivers
    // by getting their public capability
    // and borrowing a reference from the capability
    let acct6ReceiverRef = acct6.capabilities.get<&{ExampleToken.Balance}>
                          (/public/CadenceFungibleTokenTutorialReceiver)
                          .borrow()
            ?? panic("Could not borrow a balance reference to "
                     .concat("0x06's ExampleToken.Vault")
                     .concat(". Make sure 0x06 has set up its account ")
                     .concat("with an ExampleToken Vault and valid capability."))

    let acct7ReceiverRef = acct7.capabilities.get<&{ExampleToken.Balance}>
                          (/public/CadenceFungibleTokenTutorialReceiver)
                          .borrow()
            ?? panic("Could not borrow a balance reference to "
                     .concat("0x07's ExampleToken.Vault")
                     .concat(". Make sure 0x07 has set up its account ")
                     .concat("with an ExampleToken Vault and valid capability."))

    let returnArray: [UFix64] = []

    // verify that the balances are correct
    if acct6ReceiverRef.balance != 50.0 || acct7ReceiverRef.balance != 10.0 {
        panic("Wrong balances! Account 6 Balance should be 50 and Account 7 balance should be 10.")
    }

    // Find the public Receiver capability for their Collections
    let acct6Capability = acct6.capabilities.get<&ExampleNFT.Collection>(ExampleNFT.CollectionPublicPath)
    let acct7Capability = acct7.capabilities.get<&ExampleNFT.Collection>(ExampleNFT.CollectionPublicPath)

    // borrow references from the capabilities
    let nft1Ref = acct6Capability.borrow()
        ?? panic("Could not borrow a collection reference to 0x06's ExampleNFT.Collection"
                 .concat(" from the path ")
                 .concat(ExampleNFT.CollectionPublicPath.toString())
                 .concat(". Make sure account 0x06 has set up its account ")
                 .concat("with an ExampleNFT Collection."))

    let nft2Ref = acct7Capability.borrow()
        ?? panic("Could not borrow a collection reference to 0x07's ExampleNFT.Collection"
                 .concat(" from the path ")
                 .concat(ExampleNFT.CollectionPublicPath.toString())
                 .concat(". Make sure account 0x07 has set up its account ")
                 .concat("with an ExampleNFT Collection."))

    // verify that the collections are correct
    if nft2Ref.getIDs()[0] != 1 || nft1Ref.getIDs().length != 0 {
        panic("Wrong Collections! Account 6 should own zero NFTs and account 7 should own one.")
    }

    // Return the struct that shows the account ownership info
    return OwnerInfo(balance1: acct6ReceiverRef.balance,
                     balance2: acct7ReceiverRef.balance,
                     acct6IDs: nft1Ref.getIDs(),
                     acct7IDs: nft2Ref.getIDs())
}
If you did everything correctly, the transaction should succeed and it should print something similar to this:
"account 6 Vault Balance"
50
"account 7 Vault Balance"
10
"account 6 NFTs"
[]
"account 7 NFTs"
[1]
Congratulations, you have successfully implemented a simple marketplace in Cadence and used it to allow one account to buy an NFT from another!
Scaling the Marketplace
A user can hold a sale in their account with these resources and transactions. Support for a central marketplace where users can discover sales is relatively easy to implement and can build on what we already have. If we wanted to build a central marketplace on-chain, we could use a contract that looks something like this:
// Marketplace would be the central contract where people can post their sale
// references so that anyone can access them
access(all) contract Marketplace {
    // Data structure to store active sales
    access(all) var tokensForSale: {Address: Capability<&SaleCollection>)}

    // listSaleCollection lists a users sale reference in the array
    // and returns the index of the sale so that users can know
    // how to remove it from the marketplace
    access(all) fun listSaleCollection(collection: Capability<&SaleCollection>) {
        let saleRef = collection.borrow()
        ?? panic("Could not borrow a reference to the SaleCollection capability ")
            .concat("Make sure the owner has set up the SaleCollection ")
            .concat("in their account and provided a valid capability")

        self.tokensForSale[saleRef.owner!.address] = collection
    }

    // removeSaleCollection removes a user's sale from the array
    // of sale references
    access(all) fun removeSaleCollection(owner: Address) {
        self.tokensForSale[owner] = nil
    }

}
This contract isn’t meant to be a working or production-ready contract, but it could be extended to make a complete central marketplace by having:
- Sellers list a capability to their
SaleCollectionin this contract - Other functions that buyers could call to get info about all the different sales and to make purchases.
A central marketplace in an off-chain application is easier to implement because:
- The app could host the marketplace and a user would simply log in to the app and give the app its account address.
- The app could read the user’s public storage and find their sale reference.
- With the sale reference, the app could get all the information they need about how to display the sales on their website.
- Any buyer could discover the sale in the app and login with their account, which gives the app access to their public references.
- When the buyer wants to buy a specific NFT, the app would automatically generate the proper transaction to purchase the NFT from the seller.
Creating a Marketplace for Any Generic NFT
The previous examples show how a simple marketplace could be created for a specific class of NFTs. However, users will want to have a marketplace where they can buy and sell any NFT they want, regardless of its type. There are a few good examples of generic marketplaces on Flow right now.
- The Flow team has created a completely decentralized example of a generic marketplace in the NFT storefront repo. This contract is already deployed to testnet and mainnet and can be used by anyone for any generic NFT sale!
Composable Resources on Flow
Now that you have an understanding of how composable smart contracts and the marketplace work on Flow, you’re ready to play with composable resources! Check out the Kitty Hats tutorial!